Setting up your Service Areas
For businesses who have multiple locations and rates, service areas are a key element for success. For businesses who only have one location, service areas are just as important as you want to make sure you’re reaching your target audience.
We’ll start by discussing what service areas are and how they can be configured. If you’ve already read our introduction article, this may be redundant so feel free to jump to the how-to section to learn about how you can set them up in the system.
Service Area Overview
These are the locations your business provides services to. You can have one or more location and you can set up your payment structures to be the same or different for multiple locations. As a rule of thumb, you typically want to set up multiple service areas if they are drastically far apart (San Diego v. Orlando), if they have different rates in each location, or if caregivers are only assigned to certain locations. Otherwise, it may be easier to maintain a single location.
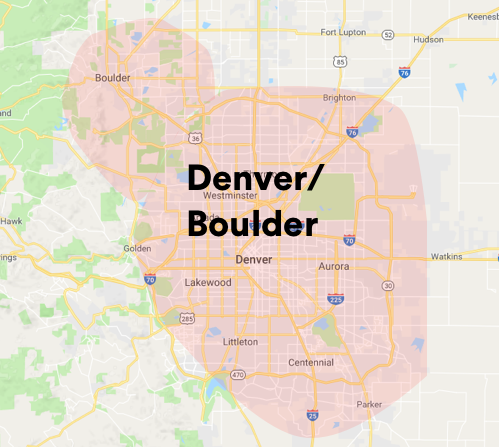
For example, the Sitter office is located in Denver, CO. If we were a care agency, we could potentially serve clients in Denver and Boulder (45 minutes northwest). We would want to set up the service areas in one of two ways:
Separate Denver Metro and Boulder Service Areas
- Used if the rates are different and/or caregivers only want to work in one location
- Provides flexibility in rates and caregiver assignments

Combined Denver/Boulder Service Area
- Used if the rates are the same and caregivers are willing to work in both locations
- Easiest to maintain

How you structure your service areas is completely up to you and you can add or change service areas as your business needs change.
Each service area is based on zip codes. If you need help identifying the zip codes in your area, this worksheet can be used: Zip Code List
Setting Up Service Areas
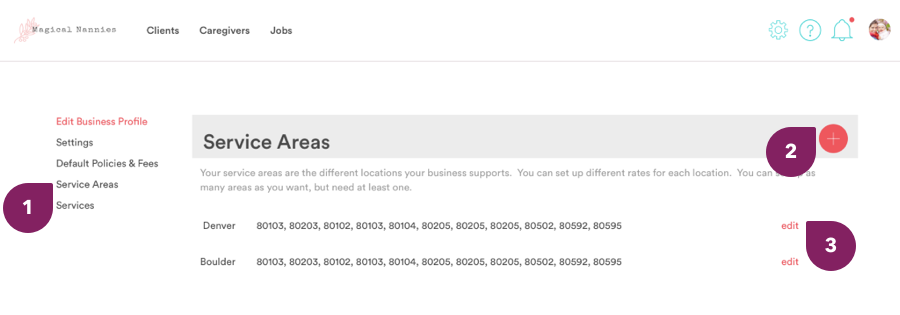
Once you’ve determined how you want to configure your service area(s), you can set them up in the system. To get started, you’ll go to your Settings page (click the cog icon in the top right) and select Service Areas (1). To create a new service area, tap on the red “+” icon in the top row (2). If you already have service areas set up, you can also edit and update them at any time by selecting ‘Edit’ (3).

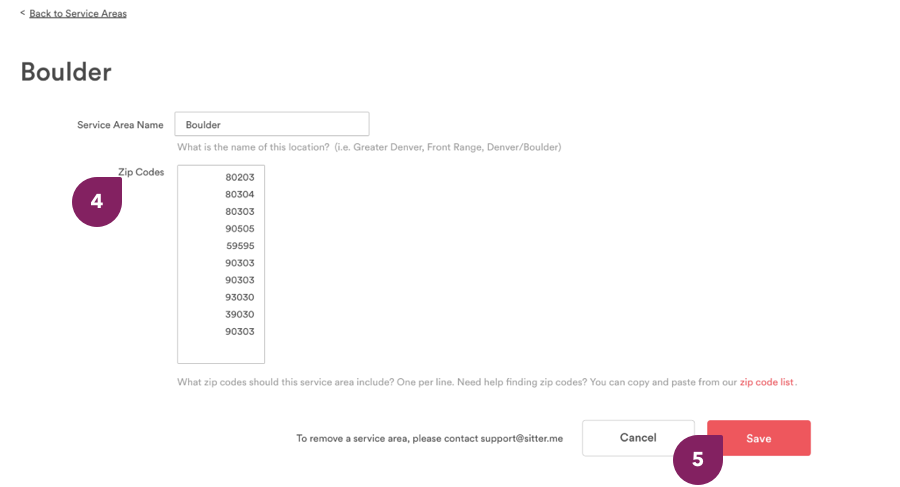
To create a service area, you’ll need to define a name for it (Denver Metro, Denver/Boulder, Front Range, etc.) and then add all of the zip codes that fall within that area (4). If you need help identifying the zip codes in your area, this worksheet can be used: Zip Code List
Each zip code will need to be entered on a separate line. Once you’ve added all zip codes, be sure to save the service area at the bottom of the page (5).

One more section down! Great job! You’ve created a service area and can create as many as you need. However, keep in mind the more you create, the more you need to manage so make sure they’re set up in a way that is easy to maintain.


